A Menagerie Of Tools
College of Idaho
CSCI 2025 - Winter 2026
Today
- Git and GitHub
- Environment Mangement
- AI (Maybe)
First: Project Roles
- To TEAMS!
Introduction
What is Version Control?
- A system that records changes to a file or set of files over time so that you can recall specific versions later.
- It allows you to revert files back to a previous state, revert the entire project back to a previous state, compare changes over time, see who last modified something that might be causing a problem, who introduced an issue and when.
- Think of it like “track changes” in a word processor, but for all your project files (code, data, text, etc.).
Why is it useful?
- Collaboration: Many people can work on the same project without overwriting each other’s changes.
- Organization: Keeps a history of your project. No more
final_report_v2_final_final.docx! - Backup: Your project history is stored in a remote, safe place (like GitHub). If your computer crashes, your work is not lost.
- Experimentation: You can try out new ideas in a “branch” without messing up the main version of your project.
Git and GitHub
What is Git?
- Git is a free and open source distributed version control system.
- It’s a command-line tool that you run on your computer to track changes in your project files.
- It’s the most popular version control system in the world.
What is GitHub?
- GitHub is a web-based hosting service for Git repositories.
- It’s a place to store your projects and collaborate with others.
- It provides a graphical interface to Git, plus other features like issue tracking, project management, and more.
- Git is the tool, GitHub is the service.
Authentication
No More Passwords
- GitHub removed support for password authentication in 2021.
- You must use a Personal Access Token (PAT) or SSH keys to push code.
- If you try to use your password, you will get an authentication error.
Setting up a PAT (R/Positron Users)
The easiest way to set this up is using R helper packages:
- Install helpers:
install.packages(c("usethis", "gitcreds")) - Create token:
usethis::create_github_token()- This opens a browser.
- Click “Generate token”.
- Copy the token (it starts with
ghp_).
- Store credentials:
gitcreds::gitcreds_set()- Paste your token when asked for a password.
That’s it! You only need to do this once per computer. Your credentials are stored system-wide and will work for all your projects.
Getting Started
Cloning a Repository
- “Cloning” is how you get a copy of a project from GitHub onto your computer.
- You only need to do this once per project.
- You’ll get a URL from the GitHub page of the repository.
- This creates a new directory on your computer with all the project files.
The Core Workflow
The Add-Commit-Push Cycle
This is the most common workflow you’ll use.
- Make changes: Edit your files, create new files, etc.
- Add files: Tell Git which files you want to save in the next “snapshot” (commit).
- Commit files: Save the snapshot with a descriptive message.
- Push changes: Send your committed changes to GitHub.
git add
- Use
git addto stage your changes. Staging is the step before committing. - You can add specific files or all files with changes.
git commit
- A “commit” is a snapshot of your staged changes.
- Each commit has a unique ID and a message.
- The message is important! It should be a short, descriptive summary of the changes you made.
git push
git pushsends your committed changes from your local computer to the remote repository on GitHub.
Good Commit Messages
- Keep them short and descriptive.
- Use the imperative mood (e.g., “Add feature” not “Added feature”).
- Explain what the change is and why you made it.
Good:
Fix typo in course syllabusUpdate plot styling in HW1Feat: Add enrollment module skeletonDocs: Explain data cleaning process
Bad:
stufffixed itaaaaaaaa
Staying in Sync
git pull
- If you’re working with others, they will merge changes into the
mainbranch. git pullfetches changes from the remote repository and merges them into your local copy.- It’s a critical habit to
pullfrommainbefore you start working to make sure you have the latest version.

Practice!
- Everyone: create a new Github Repository for your Individual Project.
- Clone it to your computer.
- Add all the stuff you’ve been working on.
- Add, commit, and push your changes to Github.
- Try making a small change, then add, commit, push again.
- Send Dr. F your repo link when done!
Environment Management
The Problem: “It works on my machine”
- You share code with a colleague, but it fails on their machine.
- You revisit an old project, but the code no longer runs because packages have updated.
- You update a package for Project A, but it breaks Project B.
The Solution: Dependency Management
- Dependency management ensures your project uses the correct package versions.
- In R,
renvis the standard tool for this. - Key features:
- Isolation: Each project has its own library of packages.
- Reproducibility: Records exact package versions in a lockfile.
- Portability: Easy to install the same environment on another machine.
How renv Works
Key Components
- Project Library: Use a per-project library (
renv/library) instead of the system library. - Lockfile (
renv.lock): A JSON file recording the exact version and source of every package. - Activation Script (
renv/activate.R): Automatically loads the project environment when you open the project.
The Workflow
- Initialize:
renv::init()(do this once) - Work:
install.packages()and get your code working - Snapshot:
renv::snapshot(), (each time you finish installing packages and get your code working) - Restore:
renv::restore(), (any time you download the project)
0. Initialize
- Run
renv::init()to start usingrenvin a project. - This:
- Sets up the project library.
- Generates a lockfile (
renv.lock) with currently installed packages. - Creates an
.Rprofileto activaterenvon startup.
- Restart R to ensure the environment is active.
1. Work
- Install packages as usual:
install.packages("dplyr")install.packages("ggplot2")
- These go into your project library, not your global library.
- Other projects are unaffected!
2. Snapshot
- When your code works, save the state of your library:
renv::snapshot()
- This updates
renv.lockwith the versions you are currently using. - Commit
renv.lockto Git!
3. Restore
- When you (or a collaborator) download the project:
- Open the project (R will auto-activate
renv). - Run
renv::restore().
- Open the project (R will auto-activate
- This installs all packages exactly as specified in
renv.lock.
Checking Status
- Run
renv::status()to see if your library matches your lockfile. - It tells you if:
- You installed packages but haven’t snapshotted them.
- Your lockfile has packages you haven’t installed yet.
Best Practices
What to Commit to Git
- Do Commit:
renv.lock.Rprofilerenv/activate.Rrenv/settings.json(if it exists)
- Do NOT Commit:
renv/library(these are the installed files, which are large and platform-specific)renv/python(if using Python)renv/staging
Summary
- Use
renvfor every serious project. init()to start.snapshot()to save.restore()to load.- Enjoy reproducible data science!
Practice!
In your Individual Project repository:
Initialize renv for the project.
Add the following lines to your
.gitignorefile to avoid committing the library:
/renv/library/
/renv/python/
/renv/staging/- Practice installing new packages, adding them to the lockfile, pushing them to github, and then pulling/restoring.
Back to Git
What is a Branch?
- A branch is a parallel version of your repository.
- It allows you to work on new features or fixes without affecting the main codebase (the
mainbranch). - This is essential for teamwork.
A Collaborative Workflow: The Feature Branch
For our group project, we will use a workflow that prevents accidentally breaking the main version of our app. You will not push directly to main.
The core idea is:
- Create a copy of the project (a “branch”) where you can work safely.
- Make all your changes on that branch.
- When you’re ready, you’ll open a “Pull Request” to have your changes reviewed and merged into the
mainbranch.
The Branching Workflow: A Full Example
- Sync your local
mainbranch: - Create a new branch for your work: For the project, your team leader (the “GitHub Sentinel”) will do this. Branch names should be descriptive, like
feature/team-name. - Work on your branch: Now you do the familiar add-commit cycle.
- Push your branch to GitHub: The
-uflag sets the upstream branch so you can justgit pushnext time.
Pull Requests: Proposing Changes
Now that your branch is on GitHub, you needs to ask for it to be merged into main.
What is a Pull Request?
- A Pull Request (or PR) is a formal request to merge your changes.
- You’re asking the project maintainer (the “Lead Architect” for your project) to “pull” your changes from your branch into the
mainbranch. - It’s a place for code review and discussion before the changes are integrated.
How to open a Pull Request
- After pushing the branch, go to the repository on GitHub.
- GitHub will usually show a banner prompting you to “Compare & pull request”. Click it!
- If not, go to the “Pull requests” tab and click “New pull request”.
- Select your team’s branch as the “compare” branch and
mainas the “base” branch. - Write a clear title and description for your changes. Explain what you did.
- Click “Create pull request”.
Review and Merging
- Once the PR is open, the “Lead Architect” and other team members can review your code, add comments, and request changes.
- If changes are requested, your team makes them on the local branch, then
commitsandpushesagain. The PR will update automatically. - Once approved, the Lead Architect will merge your branch into
main. Your work is now part of the official project!
A Note on Merge Conflicts
- If you and another person edit the same lines in the same file on different branches, Git won’t know which version to keep when merging.
- This is a merge conflict.
- The person merging the PR (or the Sentinel, before opening it) will need to manually resolve the conflict by choosing which code to keep.
- The best way to avoid conflicts: Pull from
mainoften and communicate with your team!
After a PR is Merged
Once your team’s branch is merged by the Lead Architect, everyone should update their local repository.
Switch back to your main branch:
git checkout mainPull the latest changes (which now include the merged work):
git pullNow your
mainis up to date, and you can create a new branch for the next feature!
Group Practice 1!
Let’s break up into groups. Have one person create a new repository on GitHub and add the others as collaborators:
- (Person A) Create a new public repository on GitHub. Add your teamates as collaborators.
- (Person A) Initialize it with a
README.mdfile. - (Person B/C) Accept the collaborator invitation (check your email!).
- (Everyone) Clone it to your computer.
On Person A’s Computer
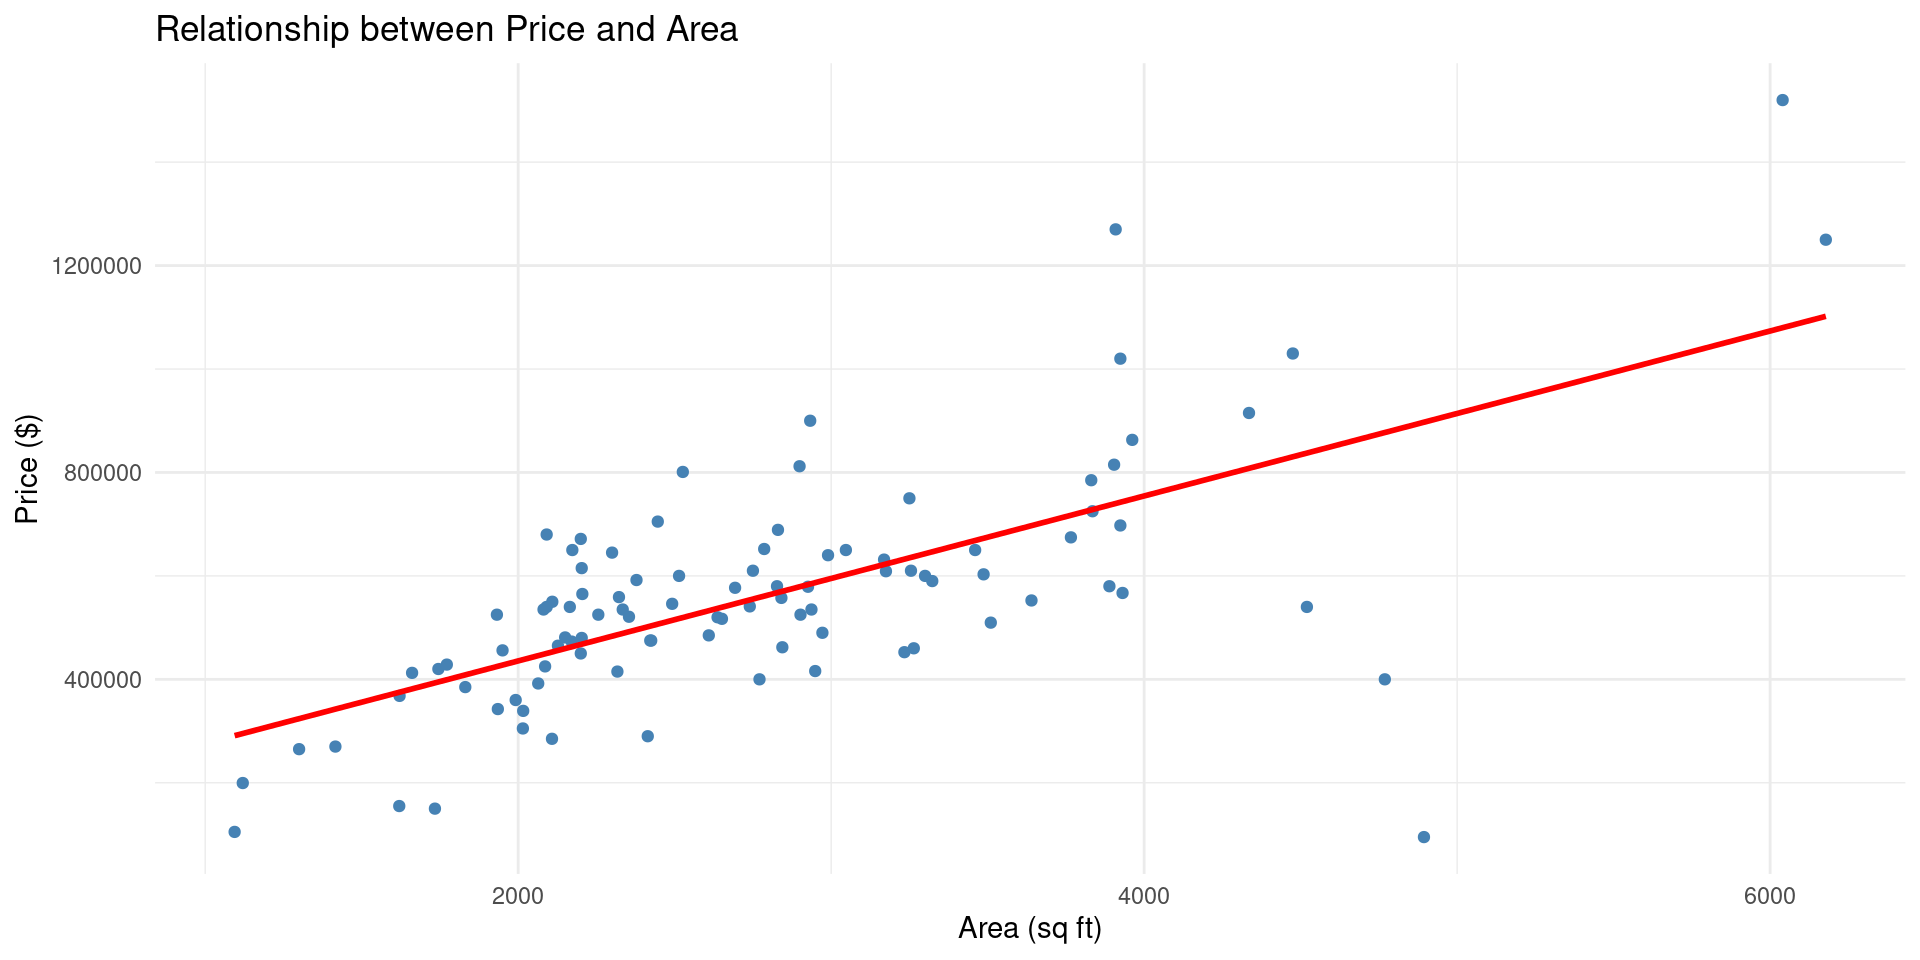
Recreate this graph from the duke_forest dataset in the openintro package:
On Person B’s Computer
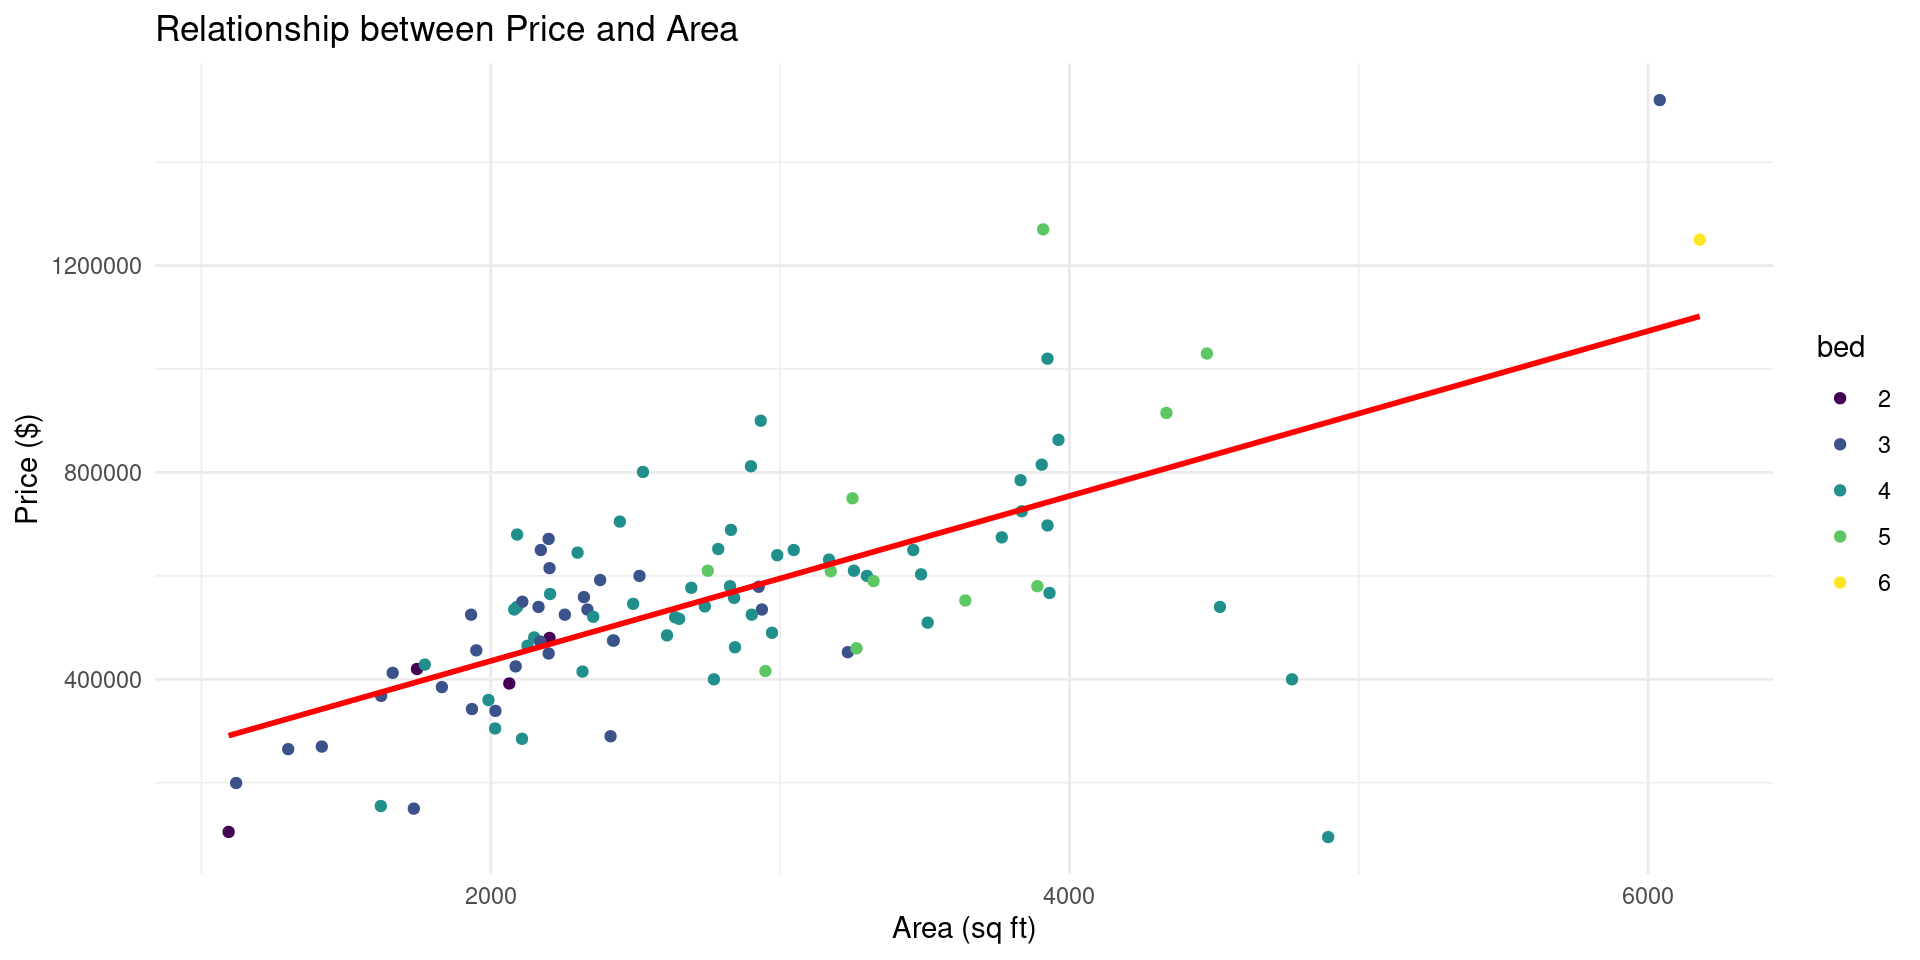
Modify the plot above so it looks like this:
On Person C’s Computer
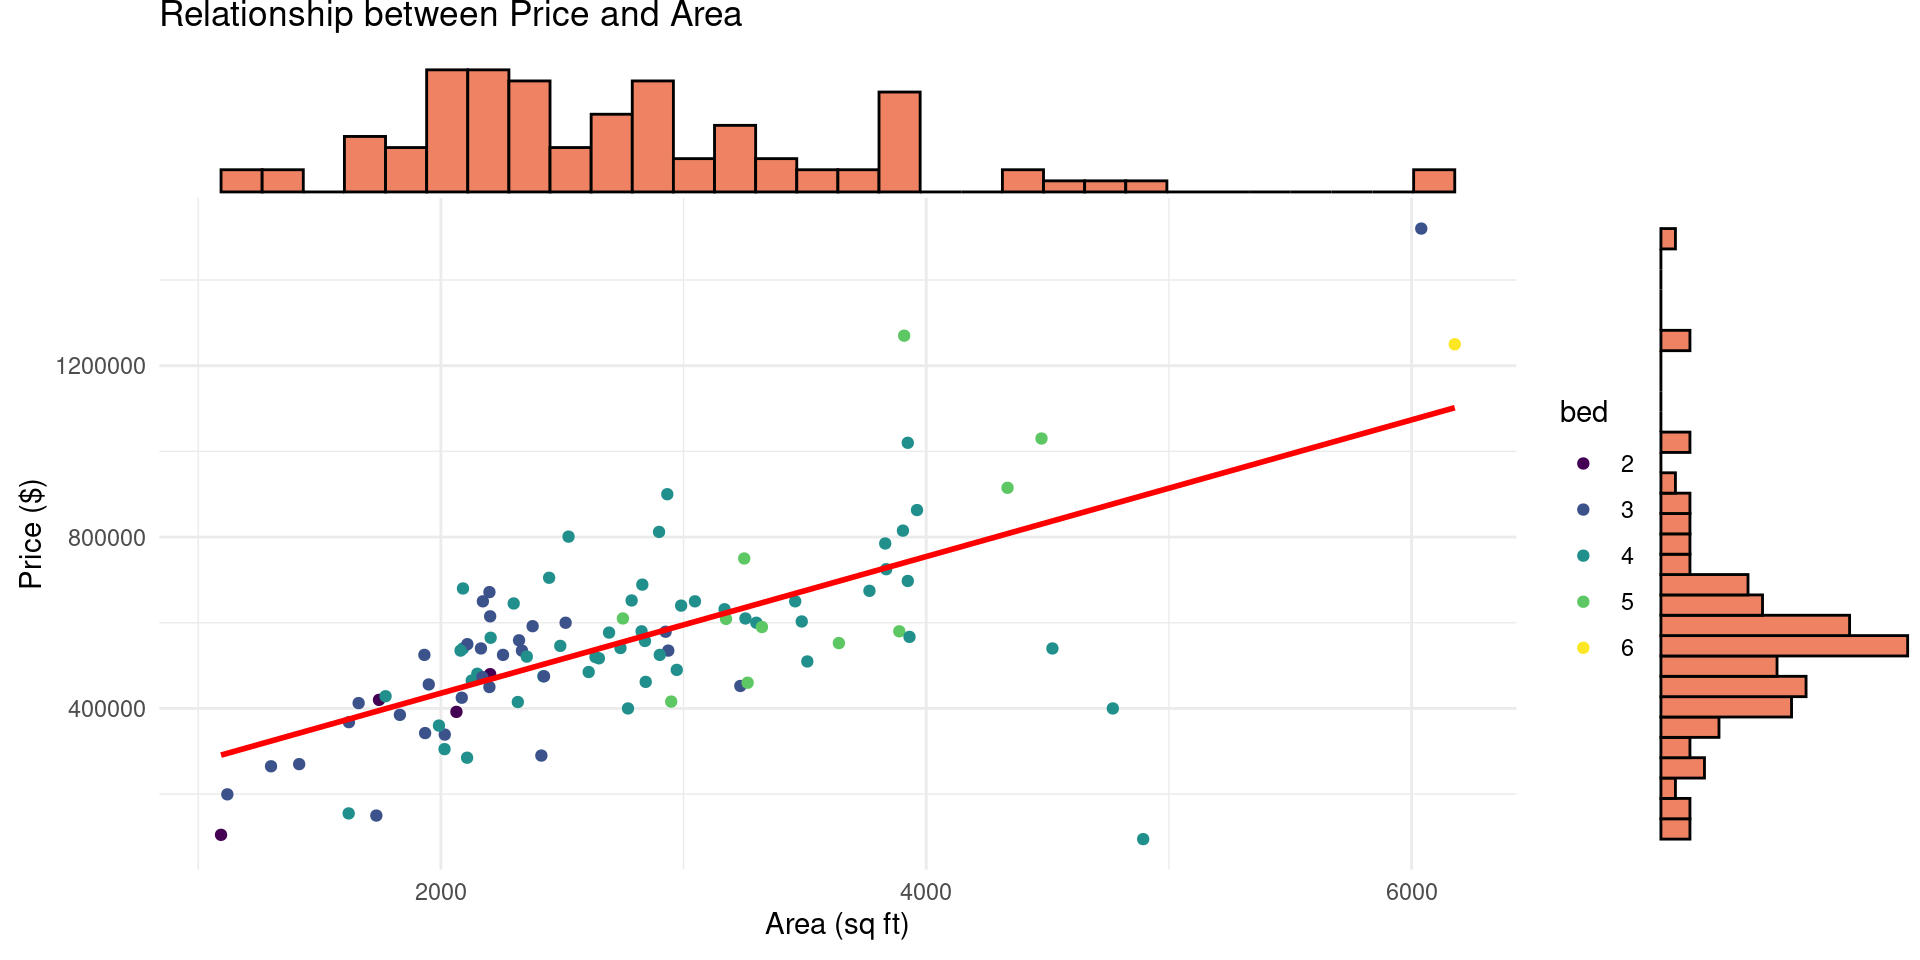
Modify the plot above so it looks like this (Hint: look up ggMarginal from the ggExtra package):
Group Practice 2!
In the repo you just created:
- Ignore PRs for now, just practice branching and merging directly to main.
- (Everyone) Create a new branch for your work. (Click
... -> Branch -> Create Branch..., then give the it a name, and push it to GitHub) - (Everyone) Checkout your new branch. (Click
... -> Checkout to..., then select the branch you just created) - (Everyone) Modify the plot you just created! Make it your own and push to Github on the new branch.
Merging Your Changes
- Vote on one person to go first.
- Pull the latest changes from
mainto your branch and checkoutmain. ... -> Branch -> Merge. This will initiate the merge process. You now need to resolve any conflicts that arise.
You need to clean this up so it look exactly what you it should look like. Then save the file. Positron provides some really nice merge tools that make this easy.
- Once there are no more merge conflicts, commit the merge.
- Push the updated
mainbranch to GitHub. - Move on to the next person!
AI Tools
Overview
- Github Copilot
- Gemini Code Assistant
- Gemini CLI